
CSS Tutorial: Div with Background Video
With the recent improvements in web design and development technologies, you can now place video backgrounds to HTML elements on your website. This tutorial will demonstrate how to create a div element with a background video using CSS.
Adding background images to HTML elements on a web page is a nice way to enhance the style and look of your website. Going one step further and adding background videos to elements on a page is taking it to the next level. If used properly and relevantly, auto-playing video backgrounds may make a website look more attractive and enrich the overall experience it offers to its users.
When it comes to adding video content to your website, you have a couple of options. One of the options for displaying a video on your web page is to host it on a third party site (e.g. YouTube, Vimeo) and embed it using an iframe such as the YouTube video embeds. Another option is to host the video file on your web server and include on your page via HTML's video tag. Another way of placing a video is to use it in the background of another element and make it auto-play when the user opens the page.
Before You Put That Video on Your Site
You most probably have seen many websites that use videos playing in the background of a certain section of the page and while it may look cool, it will be beneficial to consider the following important points before using videos on your site.
While embedded videos have a higher chance of playing correctly on as many devices and browsers as possible, we can't say the same thing for self-hosted videos. Except for the modern web browsers and some of the advanced mobile browsers, older browsers and devices will have problems displaying the videos. Therefore, video backgrounds should be used only where it will really improve the website experience.
When using auto-playing videos on websites as background videos, it is recommended to use videos with no audio. Most web users do not really like to suddenly hear sound on a web page they just opened. They may be studying at the library, working at the office or listening to something else, in which case an auto-playing video with audio will certainly create frustration.
Make sure that the content or the text in front of the video background is easily visible and readable during the play of the video. Check this on different screen sizes to make sure the background video doesn't render the content unreadable.
Also note that, video files are generally a lot larger in file size compared to text or image files, hence they will consume your web hosting bandwidth and your visitors' Internet access quota much more quickly. A basic HTML website consumes a lot less bandwidth and server resources compared to a highly complex website with lots of images, videos and dynamic things going on. So, it is better to keep the video file size small and use it only when necessary.
We can now continue with how video backgrounds work.
How to Add Video Backgrounds to Div Elements
In our other tutorials, we talked about full screen background images, full screen background videos and divs with background images. What is left in this short CSS series is the divs with background videos, which we will be dealing with now.
If you need a sample video to use for following this tutorial, you can check Pixabay for some free videos.
STEP 1: Open the HTML file of the page where you will place the video background, in your web design software or website builder if you're using one.
STEP 2: On your page, create a parent div element (container) with a child div element (content) and a video element (video) using the following code:
<div id="container">
<video id="video">
<source src="video.mp4" type="video/mp4">
<source src="video.ogg" type="video/ogg">
</video>
<div id="content">CSS Div with Video Background Demo</div>
</div>
In the above code, the container div is used for positioning and alignment purposes. The content div holds the content to be displayed in front of the video, it can have any content and other HTML elements as you wish. The video element is what will display the video in the background.
In this example, we used two formats for the video file which are .mp4 and .ogg to ensure that the video will play well on most browsers. Note the use of the <source> tag, as well as the type attribute within the <video> element. You can use other video formats and add more video file sources as you wish. Just make sure to use the correct MIME types. Incorrectly using video files may result in "No video with supported format and MIME type found." issue in Firefox.
STEP 3: Open your CSS file and insert the following code:
#container { position:relative; width:400px; height:300px }
#video, #content { position:absolute; width:400px; height:300px }
We used position:relative for #container and position:absolute for #video and #content, so that you can move the container on the page as you wish and its child elements will follow. The width and height values are selected based on the aspect ratio of the video to ensure best visibility of the video. The video in this example has a 4:3 aspect ratio, hence the dimensions 400:300 pixels. You can use any dimensions you like based on your video's aspect ratio.
You can style the content that will be displayed in front of the video the way you want. For example, you can use the following:
#content { text-align:center; margin-top:40px; color:#fff; font-size:24px; font-weight:bold }
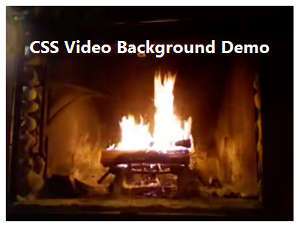
The result will be like the following:
Additional Video Controls
The HTML <video> tag accepts the following attributes to control how the video is displayed and played.
autoplay
The autoplay attribute is used for starting the video to play as soon as the page loads. This is a desired behavior for background videos, hence you should have this attribute in your video element.
loop
The loop attribute is used for continuously looping the video when it ends. This is also desired for background videos, hence you should also have this attribute.
muted
The muted attribute is used for muting the sound of the video. Only necessary if you are using a video with audio.
poster
The poster attribute is used for the image to be shown until the video fully downloads and starts playing. This is optional but since downloading and starting to play a video may take some time especially on slow Internet connections, it is better to use a placeholder image which will be downloaded much quicker, instead of leaving the background as empty.
Your final HTML and CSS code will look like this:
<div id="container">
<video id="video" autoplay loop muted poster="bg.jpg">
<source src="video.mp4" type="video/mp4">
<source src="video.ogg" type="video/ogg">
</video>
<div id="content">CSS Video Background Demo</div>
</div>
#container { position:relative; width:400px; height:300px }
#video, #content { position:absolute; width:400px; height:300px }
#content { text-align:center; margin-top:40px; color:#fff; font-size:24px; font-weight:bold }
After finishing the work on your page, don't forget to preview it on various desktop and mobile browsers to make sure the video background div will work with no issues. If you are happy with the result, you can publish your site using a FTP application.
More CSS Tips
CSS Tutorial: Div with Background Image Most Common CSS Mistakes and How to Avoid Them How to Hide Scrollbars with CSS 5 Ways to Center Anything in CSS Easily CSS Full Screen Video Background Tutorial CSS Full Screen Background Image Tutorial CSS Browser Compatibility: What You Should Avoid Double Underline and Double Overline Text with CSS Designing a Simple Testimonial Box with CSS
CSS Tips